Creating your MicroVM cloud at home?

Creating your own cloud at home?
I constantly use virtual machines to test scripts, host services, perform deployment tests, etc. I usually use Proxmox in my lab, and Libvirt at work.
Recently, I have been deepening my knowledge of public clouds like AWS, GCP, Azure, etc. And if there is one thing that fascinates me, it’s how quickly you can create a virtual machine.
I sometimes use Cloud-Init to automate the creation of my virtual machines or Packer to create VM templates, but we are talking about a few minutes (not seconds).
It was during my research on this topic that I came across Firecracker, an open-source project from AWS that allows you to create microVMs in a few milliseconds (yes, milliseconds). This solution is used by AWS Lambda and AWS Fargate services as well as other companies like fly.io, Koyeb, or AppFleet.
So, I want to be able to create virtual machines in a few milliseconds, but also be able to destroy and recreate them on the fly. As a result, these virtual machines can be used for testing, deployments, services, etc.
Why not use containers? Good question. I could use containers, but my goal is to have a complete operating system, with a kernel, services, etc. I want to be able to use tools like eBPF for monitoring, use namespaces to isolate my services, modify network configuration… In short, it’s impossible to do all that with containers.
What is Firecracker?
Firecracker is an open-source hypervisor that allows you to create microVMs. These are lightweight, secure, and isolated virtual machines. They are based on KVM and are therefore Linux virtual machines like any other.
Firecracker is written in Rust and is therefore compiled into binary. It can be launched as root or as a non-privileged user (rootless). Similarly, multiple instances of Firecracker can be run on the same machine (we will see that later).
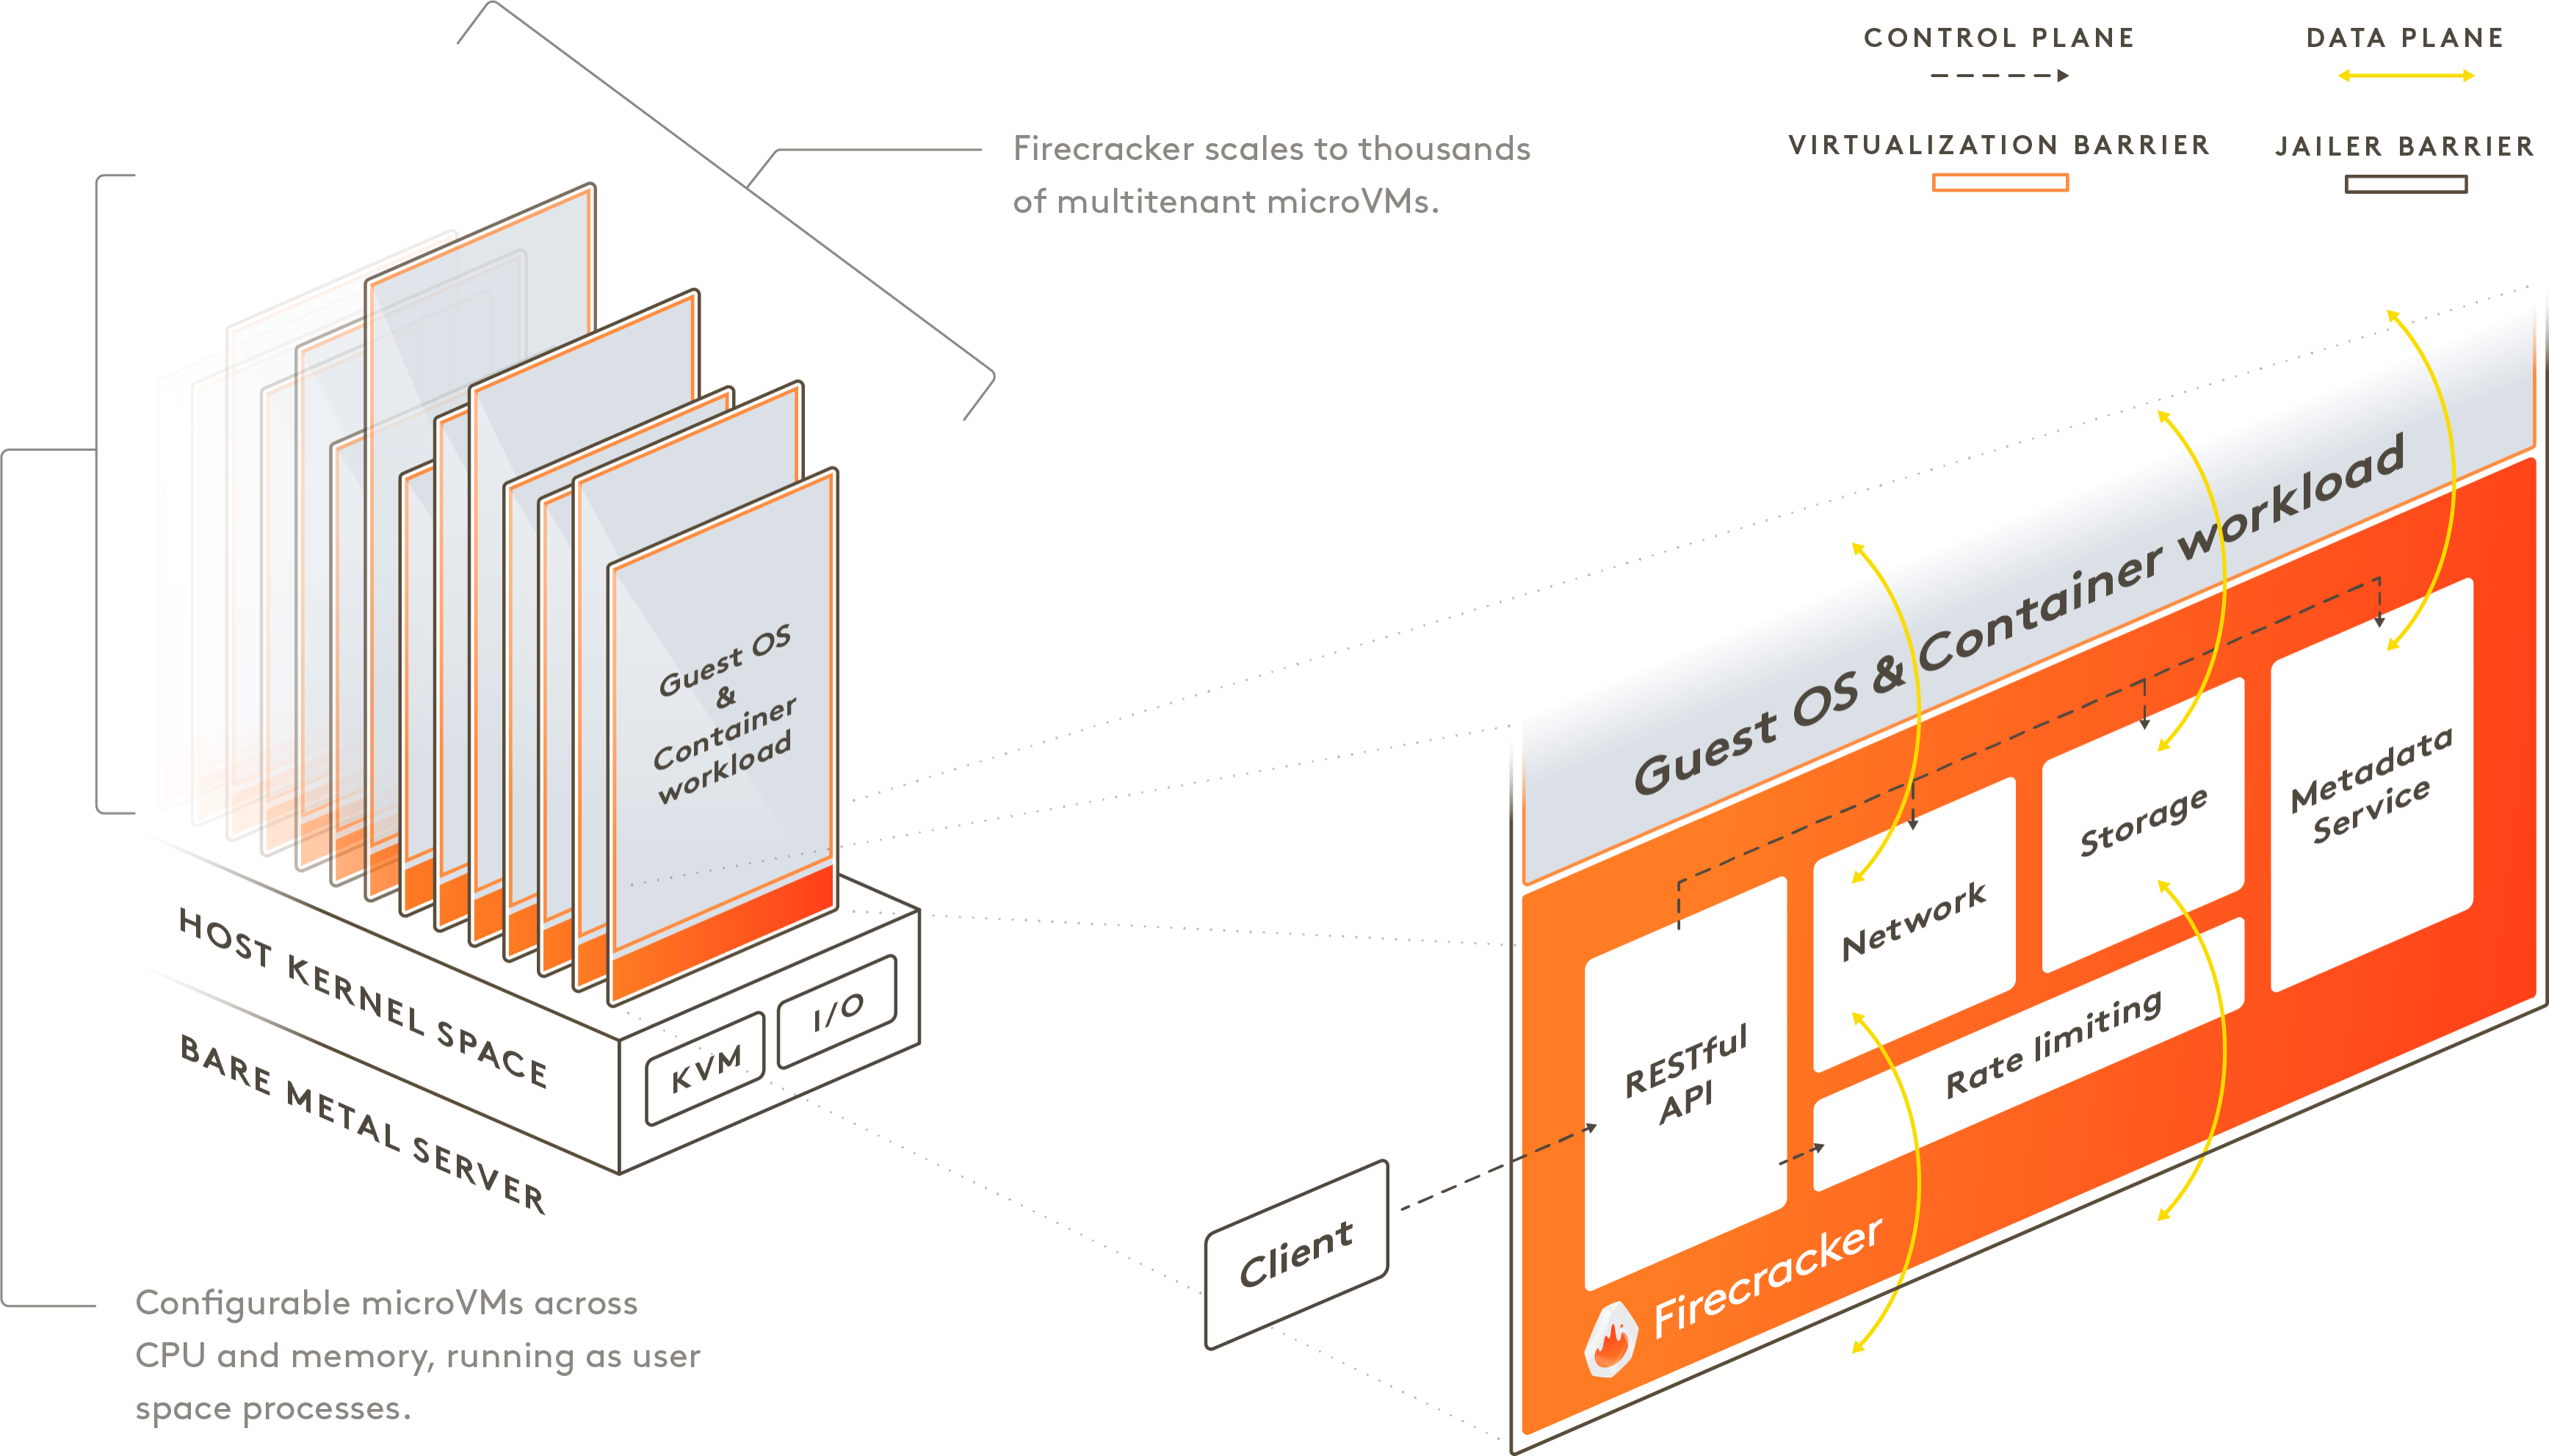
To quote the official documentation: “Firecracker combines the security and isolation properties provided by hardware virtualization technology with the speed and flexibility of containers.”
Install Firecracker
Firecracker is available as a binary compiled for x86_64 and aarch64 architectures.
Before downloading the binary, we will check if our machine is compatible with Firecracker.
[ -r /dev/kvm ] && [ -w /dev/kvm ] && echo "OK" || echo "FAIL"
If the command returns OK, then the machine is compatible with hardware virtualization.
ARCH="$(uname -m)"
release_url="https://github.com/firecracker-microvm/firecracker/releases"
latest=$(basename $(curl -fsSLI -o /dev/null -w  %{url_effective} ${release_url}/latest))
curl -L ${release_url}/download/${latest}/firecracker-${latest}-${ARCH}.tgz \
| tar -xz

mv release-${latest}-$(uname -m)/firecracker-${latest}-${ARCH} /usr/bin/firecracker
Tip
To run Firecracker as a non-privileged user (rootless), you can create an ACL to grant your user read and write permissions on the /dev/kvm device.
sudo apt install acl -y
sudo setfacl -m u:${USER}:rw /dev/kvm
Starting your first VM
In a first terminal, let’s launch Firecracker using the following command:
/usr/bin/firecracker --api-sock /tmp/firecracker.socket
Then, in a second terminal, we will create a VM using the hello world image downloadable from Amazon. We will define the kernel (and boot arguments), the disk, and finally start the VM.
mkdir -p /var/lib/firecracker
cd /var/lib/firecracker
mkdir hello && cd hello
curl -fsSL -o hello-vmlinux.bin https://s3.amazonaws.com/spec.ccfc.min/img/hello/kernel/hello-vmlinux.bin
curl -fsSL -o hello-rootfs.ext4 https://s3.amazonaws.com/spec.ccfc.min/img/hello/fsfiles/hello-rootfs.ext4

curl --unix-socket /tmp/firecracker.socket -i \
    -X PUT 'http://localhost/boot-source' \
    -H 'Accept: application/json' \
    -H 'Content-Type: application/json' \
    -d '{
        "kernel_image_path": "/var/lib/firecracker/hello/hello-vmlinux.bin",
        "boot_args": "console=ttyS0 reboot=k panic=1 pci=off"
    }'

curl --unix-socket /tmp/firecracker.socket -i \
    -X PUT 'http://localhost/drives/rootfs' \
    -H 'Accept: application/json' \
    -H 'Content-Type: application/json' \
    -d '{
        "drive_id": "rootfs",
        "path_on_host": "/var/lib/firecracker/hello/hello-rootfs.ext4",
        "is_root_device": true,
        "is_read_only": false
    }'

curl --unix-socket /tmp/firecracker.socket -i \
    -X PUT 'http://localhost/actions' \
    -H  'Accept: application/json' \
    -H  'Content-Type: application/json' \
    -d '{
        "action_type": "InstanceStart"
    }'
In the first terminal, we find ourselves with an interface allowing us to connect to the virtual machine. This is thanks to the bootarg console=ttyS0 making a terminal available via the serial link of the newly created instance.
Welcome to Alpine Linux 3.8
Kernel 4.14.55-84.37.amzn2.x86_64 on an x86_64 (ttyS0)

localhost login:
By default, the username/password pair is root/root.
It’s all well and good, but we are dealing with rather old hardware here: an Alpine 3.8 and the 4.14 kernel both date back to 2018. Let’s start by creating a slightly more up-to-date machine.
Compiling your own kernel
With the aim of updating our VM, let’s first compile our own kernel. I will intentionally skip the details of kernel compilation (that’s not the focus here). However, if you are interested, I invite you to watch the replay of Olivier Poncet’s live stream which explains very well how to compile a kernel.
As of today, the latest kernel version is 6.6, so we will compile that.
apt install -y git build-essential flex bison libncurses5-dev libssl-dev gcc bc libelf-dev pahole
git clone --depth=1 -b linux-6.6.y git://git.kernel.org/pub/scm/linux/kernel/git/stable/linux-stable.git
cd linux-stable
curl -fsSL -o .config https://raw.githubusercontent.com/firecracker-microvm/firecracker/main/resources/guest_configs/microvm-kernel-ci-x86_64-6.1.config # Configuration du noyau pour firecracker

make menuconfig # Optional, allows to modify the kernel configuration

yes ''  | make vmlinux -j$(nproc)
cp vmlinux /var/lib/firecracker/6.6-vmlinux # Copy the kernel to the firecracker directory
With our freshly compiled new kernel, we will create a new VM from it.
Creating a new VM
curl --unix-socket /tmp/firecracker.socket -i \
    -X PUT 'http://localhost/boot-source' \
    -H 'Accept: application/json' \
    -H 'Content-Type: application/json' \
    -d '{
        "kernel_image_path": "/var/lib/firecracker/6.6-vmlinux",
        "boot_args": "console=ttyS0 reboot=k panic=1 pci=off"
    }'

curl --unix-socket /tmp/firecracker.socket -i \
    -X PUT 'http://localhost/drives/rootfs' \
    -H 'Accept: application/json' \
    -H 'Content-Type: application/json' \
    -d '{
        "drive_id": "rootfs",
        "path_on_host": "/var/lib/firecracker/6.6-vmlinux/hello/hello-rootfs.ext4",
        "is_root_device": true,
        "is_read_only": false
    }'

curl --unix-socket /tmp/firecracker.socket -i \
    -X PUT 'http://localhost/actions' \
    -H  'Accept: application/json' \
    -H  'Content-Type: application/json' \
    -d '{
        "action_type": "InstanceStart"
    }'
Starting default runlevel

Welcome to Alpine Linux 3.8
Kernel 6.6.8 on an x86_64 (ttyS0)

localhost login: root
Password:
Welcome to Alpine!

The Alpine Wiki contains a large amount of how-to guides and general
information about administrating Alpine systems.
See <http://wiki.alpinelinux.org>.

You can setup the system with the command: setup-alpine

You may change this message by editing /etc/motd.

login[637]: root login on 'ttyS0'
localhost:~# uname -a
Linux localhost 6.6.8 #1 SMP PREEMPT_DYNAMIC Wed Dec 27 12:59:19 CET 2023 x86_64 Linux
Our VM now has a newer kernel 🥳
Let’s now move on to the file system (rootfs) currently based on Alpine 3.8.
Creating your own rootfs on Alpine
We will create our own rootfs. To do this, let’s initialize a blank partition at the location /tmp/alpine.ext4.
dd if=/dev/zero of=/tmp/alpine.ext4 bs=1G count=16
mkfs.ext4 /tmp/alpine.ext4
mkdir -p /mnt/alpine
mount /tmp/alpine.ext4 /mnt/alpine
For the content of our rootfs, I will rely on the cloud version of Alpine, available as a qcow2 file on the official website. I will therefore mount the qcow2 file in a temporary directory (/tmp/cloud-alpine-3.19-qcow2) and copy the content into our rootfs (on /mnt/alpine).
curl -fsSL -o /tmp/alpine-3.19.qcow2 https://dl-cdn.alpinelinux.org/alpine/v3.19/releases/cloud/nocloud_alpine-3.19.0-x86_64-bios-tiny-r0.qcow2
apt install qemu-utils
modprobe nbd
qemu-nbd --connect=/dev/nbd0 /tmp/alpine-3.19.qcow2
mkdir -p /tmp/cloud-alpine-3.19-qcow2
mount /dev/nbd0 /tmp/cloud-alpine-3.19-qcow2
We should have a filesystem mounted in /tmp/cloud-alpine-3.19-qcow2.
# ls /tmp/cloud-alpine-3.19-qcow2/
bin  boot  dev  etc  home  lib  lost+found  media  mnt  opt  proc  root  run  sbin  srv  sys  tmp  usr  var
I then use the latter to copy the content into my rootfs.
cd /tmp/cloud-alpine-3.19-qcow2/
rsync -av --progress . /mnt/alpine --exclude boot/
I can enter my rootfs using the chroot command. I take this opportunity to update my system, install packages, etc. but most importantly, I can set a password for the root user (as there isn’t one by default).
chroot /mnt/alpine/ /bin/ash
echo "nameserver 1.1.1.1" > /etc/resolv.conf
apk update
apk add vim curl git
exit # Pour sortir du chroot
Warning
Do not be surprised if your prompt does not change after the chroot command. This is normal behavior.
umount /mnt/qcow2_mount
qemu-nbd --disconnect /dev/nbd0
Our rootfs is now ready, we can copy it to the Firecracker directory and create a new VM.
umount /mnt/alpine
cp /tmp/alpine.ext4 /var/lib/firecracker/alpine-rootfs.ext4
Create a VM with Alpine 3.19
curl --unix-socket /tmp/firecracker.socket -i \
    -X PUT 'http://localhost/boot-source' \
    -H 'Accept: application/json' \
    -H 'Content-Type: application/json' \
    -d '{
        "kernel_image_path": "/var/lib/firecracker/6.6-vmlinux",
        "boot_args": "console=ttyS0 reboot=k panic=1 pci=off"
    }'

curl --unix-socket /tmp/firecracker.socket -i \
    -X PUT 'http://localhost/drives/rootfs' \
    -H 'Accept: application/json' \
    -H 'Content-Type: application/json' \
    -d '{
        "drive_id": "rootfs",
        "path_on_host": "/var/lib/firecracker/alpine-rootfs.ext4",
        "is_root_device": true,
        "is_read_only": false
    }'

curl --unix-socket /tmp/firecracker.socket -i \
    -X PUT 'http://localhost/actions' \
    -H  'Accept: application/json' \
    -H  'Content-Type: application/json' \
    -d '{
        "action_type": "InstanceStart"
    }'
Welcome to Alpine Linux 3.19
Kernel 6.6.8 on an x86_64 (/dev/ttyS0)

(none) login: root
We keep our kernel 6.6 and we have Alpine 3.19 (the latest version).
I really like Alpine, but what if I have a program that is suitable for Debian instead of Alpine?
Create your own rootfs under Debian
For the needs of programs running on Debian/Ubuntu, I will install a Debian Trixie (which is not officially released but why not?).
Just like with Alpine, I will create our rootfs file and format it in ext4.
dd if=/dev/zero of=/tmp/debian-trixie.ext4 bs=1G count=16
mkfs.ext4 /tmp/debian-trixie.ext4
mkdir -p /mnt/debian
mount /tmp/debian-trixie.ext4 /mnt/debian
I will then use debootstrap to create a Debian Trixie in the directory /mnt/debian.
Info
Debootstrap is a tool that allows you to install a basic Debian system in a subdirectory of another existing system. It does not require an installation CD, just access to a Debian repository. It can be installed and run from another operating system. source
apt install debootstrap -y
mkdir -p /tmp/debian-debootstrap/
debootstrap --include openssh-server,unzip,git,apt,vim 'trixie' /tmp/debian-debootstrap/  http://deb.debian.org/debian
Once the command is completed, we will have a complete directory structure in the /tmp/debian-debootstrap directory. I will launch a new chroot to set a password for the root user. You can also add an ssh key and modify the hostname (by default, the hostname is the same as the machine that launched debootstrap).
# chroot /tmp/debian-debootstrap/
root@firecracker:/# passwd
New password:
Retype new password:
passwd: password updated successfully
root@firecracker:/# vim /etc/hostname /etc/hosts
root@firecracker:/# exit
Tip
If you want to use DHCP for dynamic addressing (we will see this later in the article), you can add the following lines to the /etc/network/interfaces file of the chroot:
allow-hotplug eth0
iface eth0 inet dhcp
All that’s left is to copy it to /mnt/debian (which corresponds to our file /tmp/debian-trixie.ext4).
cd /tmp/debian-debootstrap
rsync -av --progress . /mnt/debian --exclude boot/
umount /mnt/debian
cp /tmp/debian-trixie.ext4 /var/lib/firecracker/debian-rootfs.ext4
Let’s try out our new Debian Trixie rootfs right away:
Création d'une VM Debian Trixie
curl --unix-socket /tmp/firecracker.socket -i \
    -X PUT 'http://localhost/boot-source' \
    -H 'Accept: application/json' \
    -H 'Content-Type: application/json' \
    -d '{
        "kernel_image_path": "/var/lib/firecracker/6.6-vmlinux",
        "boot_args": "console=ttyS0 reboot=k panic=1 pci=off"
    }'

curl --unix-socket /tmp/firecracker.socket -i \
    -X PUT 'http://localhost/drives/rootfs' \
    -H 'Accept: application/json' \
    -H 'Content-Type: application/json' \
    -d '{
        "drive_id": "rootfs",
        "path_on_host": "/var/lib/firecracker/debian-rootfs.ext4",
        "is_root_device": true,
        "is_read_only": false
    }'

curl --unix-socket /tmp/firecracker.socket -i \
    -X PUT 'http://localhost/actions' \
    -H  'Accept: application/json' \
    -H  'Content-Type: application/json' \
    -d '{
        "action_type": "InstanceStart"
    }'
Now, I can clone a small git repository and launch a test program.
Internet? How could I forget that? I need internet or network access to communicate with other machines, to do updates, to install packages, etc.
Create a NAT network for our VMs
The first method for our machines to have network access is to create an isolated network and perform NAT.
This method proves to be effective as we do not have to manage addresses on our current network. Also, it is rather easy to configure.
It is mandatory to use a TUN/TAP interface to connect our VM to a network and enable packet routing on our host machine.
ip tuntap add tap0 mode tap
ip addr add 172.16.0.1/24 dev tap0
ip link set tap0 up
sh -c "echo 1 > /proc/sys/net/ipv4/ip_forward"
We obtain a network interface tap0 with the address 172.16.0.1. We create IPTables rules to perform NAT on the ens18 interface:
sudo iptables -t nat -A POSTROUTING -o ens18 -j MASQUERADE
sudo iptables -A FORWARD -m conntrack --ctstate RELATED,ESTABLISHED -j ACCEPT
sudo iptables -A FORWARD -i tap0 -o ens18 -j ACCEPT
Warning
In my case, I’m using the ens18 interface to access my gateway. Make sure to change this interface in the commands if you’re using eth0 or any other interface.
We can now test our configuration by creating a VM.
curl --unix-socket /tmp/firecracker.socket -i \
  -X PUT 'http://localhost/network-interfaces/eth0' \
  -H 'Accept: application/json' \
  -H 'Content-Type: application/json' \
  -d '{
      "iface_id": "eth0",
      "guest_mac": "AA:FC:00:00:00:01",
      "host_dev_name": "tap0"
    }'

curl --unix-socket /tmp/firecracker.socket -i \
    -X PUT 'http://localhost/boot-source' \
    -H 'Accept: application/json' \
    -H 'Content-Type: application/json' \
    -d '{
        "kernel_image_path": "/var/lib/firecracker/6.6-vmlinux",
        "boot_args": "console=ttyS0 reboot=k panic=1 pci=off"
    }'

curl --unix-socket /tmp/firecracker.socket -i \
    -X PUT 'http://localhost/drives/rootfs' \
    -H 'Accept: application/json' \
    -H 'Content-Type: application/json' \
    -d '{
        "drive_id": "rootfs",
        "path_on_host": "/var/lib/firecracker/debian-rootfs.ext4",
        "is_root_device": true,
        "is_read_only": false
    }'

curl --unix-socket /tmp/firecracker.socket -i \
    -X PUT 'http://localhost/actions' \
    -H  'Accept: application/json' \
    -H  'Content-Type: application/json' \
    -d '{
        "action_type": "InstanceStart"
    }'
Once the VM is started, we can connect to it and configure a static IP address (since we don’t have a DHCP server).
ip addr add 172.16.0.2/24 dev eth0
ip link set eth0 up
ip route add default via 172.16.0.1 dev eth0
Once the IP is configured, I can update and access the internet.
Add a DHCP
But to avoid this step of configuring the IP address on the virtual instance, we can set up a DHCP server on our host machine that will respond to DHCP requests on the tap0 interface.
I use dnsmasq as a DHCP server on my host machine. To do this, I add the dnsmasq package and create a file /etc/dnsmasq.d/firecracker.conf to only enable the server on the tap0 interface.
apt install dnsmasq
cat <<EOF > /etc/dnsmasq.d/firecracker.conf
dhcp-range=172.16.0.50,172.16.0.150,12h
interface=tap0
EOF
systemctl restart dnsmasq
Warning
Be careful not to enable DHCP on your LAN interface, having a second DHCP could have repercussions on your network.
I restart the virtual machine and run the command dhclient -v to automatically obtain an address from our DHCP.
# dhclient -v (dans la VM)
Internet Systems Consortium DHCP Client 4.4.3-P1
Copyright 2004-2022 Internet Systems Consortium.
All rights reserved.
For info, please visit https://www.isc.org/software/dhcp/

Listening on LPF/eth0/aa:fc:00:00:00:01
Sending on   LPF/eth0/aa:fc:00:00:00:01
Sending on   Socket/fallback
DHCPDISCOVER on eth0 to 255.255.255.255 port 67 interval 6
DHCPDISCOVER on eth0 to 255.255.255.255 port 67 interval 15
DHCPDISCOVER on eth0 to 255.255.255.255 port 67 interval 16
DHCPOFFER of 172.16.0.96 from 172.16.0.1
DHCPREQUEST for 172.16.0.96 on eth0 to 255.255.255.255 port 67
DHCPACK of 172.16.0.96 from 172.16.0.1
bound to 172.16.0.96 -- renewal in 18163 seconds.
root@microvm-debian-trixie:~# ping 1.1.1.1
PING 1.1.1.1 (1.1.1.1) 56(84) bytes of data.
64 bytes from 1.1.1.1: icmp_seq=1 ttl=63 time=5.59 ms
The ideal would be to create the /etc/network/interfaces file in the rootfs so that the configuration is persistent and the machine automatically requests an IP address at startup.
#/etc/network/interfaces.d/eth0
auto eth0
iface eth0 inet dhcp
Perfect, right? But there is still a problem: if I start a second virtual machine, how can it communicate with our first virtual machine? Especially since a TUN/TAP interface can only be used by one VM at a time.
The answer: create a bridge to connect multiple TUN/TAP interfaces to the same network.
Create a bridge
As mentioned earlier, a TUN/TAP interface can only be used by one virtual machine at a time. Therefore, we will need to create one TUN/TAP interface per instance. Our goal is to create a bridge to connect all these interfaces and thus create a network of multiple virtual machines.
Let’s start by deleting the tap0 interface and the IPTables rules to start fresh.
ip link del tap0
iptables -F # Clear iptables rules
I add a bridge named br0 and assign it an IP address. This will be our main network interface to which we will connect all our TUN/TAP interfaces.
I also take this opportunity to set up packet routing and IPTables rules for NAT on the ens18 interface (essential for internet access).
ip link add name br0 type bridge
ip addr add 172.16.0.1/24 dev br0
ip link set dev br0 up
sysctl -w net.ipv4.ip_forward=1
iptables --table nat --append POSTROUTING --out-interface ens18 -j MASQUERADE
iptables --insert FORWARD --in-interface br0 -j ACCEPT
So, we should have our br0 bridge with the address 172.16.0.1/24.
With this step completed, we can create our tapX interfaces and add them to the bridge.
# Interface pour VM-1
ip tuntap add dev tap0 mode tap
brctl addif br0 tap0
ip link set dev tap0 up

# Interface pour VM-2
ip tuntap add dev tap1 mode tap
brctl addif br0 tap1
ip link set dev tap1 up
I have also modified the /etc/dnsmasq.d/firecracker.conf file to make DHCP available on all interfaces except ens18 (my LAN).
dhcp-range=172.16.0.50,172.16.0.150,12h
except-interface=ens18
I mentioned creating a second VM, but I haven’t shown you how to do it. For that, we need a second rootfs file (and luckily, we have one first under Debian, and a second one under Alpine).
Create a second VM
To summarize what we have done so far:
- Start Firecracker with a socket in
/tmp/firecracker.socket - Create a NAT network with a bridge named
br0 - Create an interface
tap0and add it to the bridgebr0 - Configure Firecracker to use the interface
tap0 - Configure Firecracker to use the rootfs
debian-rootfs.ext4and the kernel6.6-vmlinux - Start the VM
Once the VM is started, if I resend curl requests to initiate a second VM, I will encounter an error because the socket does not allow multiple VMs to be created.
The solution is to have as many Firecracker processes as VMs (and therefore network interfaces tapX).
But since running the same commands multiple times is tedious, I have created a simple script to automate this.
./run_vm.sh
#!/bin/bash
###########################################################################################
# Author: Quentin JOLY                                                                    #
# Run a Firecracker VM with a rootfs, kernel and network interface                        #
# Usage: ./run_vm.sh VM_ID FILE_ROOTFS KERNEL_PATH INTERFACE                              #
# Example: ./run_vm.sh 01 debian-rootfs.ext4 6.6-vmlinux tap0                             #
# VM_ID must be a number between 01 and 99                                                #
# FILE_ROOTFS and KERNEL_PATH has to be in "/var/lib/firecracker/" or absolute paths      #
# INTERFACE is optional, default value is "tap0"                                          #
#                                                                                         #
# LICENSE: MIT License                                                                    #
###########################################################################################

set -euo pipefail

make_curl_request() {
  local unix_socket="$1"
  local base_path="$2"
  local data="$3"
  local url="http://localhost/$base_path"

  curl --unix-socket "$unix_socket" -f -i \
    -X PUT "$url" \
    -H 'Accept: application/json' \
    -H 'Content-Type: application/json' \
    -d "$data"
}

check_command_installed() {
  local cmd="$1"

  if command -v "$cmd" &>/dev/null; then
    echo "$cmd is installed."
  else
    echo "$cmd is not installed."
  fi
}

check_valid_path() {
  local path="$1"

  # Check if the path is an absolute path
  if [[ "$path" != /* ]]; then
    path="/var/lib/firecracker/$path"
  fi

  # Check if the path exists
  if [ ! -e "$path" ]; then
    echo "Error: Path '$path' does not exist."
    exit 1
  fi
}

if [ "$#" -ne 3 ]; then
  echo "Usage: $0 VM_ID FILE_ROOTFS KERNEL_PATH [INTERFACE]"
  echo "Example: $0 01 debian-rootfs.ext4 6.6-vmlinux [tap0]"
  exit 1
fi

VM_ID=$1
ROOTFS_PATH=$2
KERNEL_PATH=$3
NETWORK_INTERFACE="${4:-tap0}"

echo "NETWORK_INTERFACE is set to: $NETWORK_INTERFACE"

if ! [[ "$1" =~ ^[0-9]{1,2}$ && "$1" -ge 1 && "$1" -le 99 ]]; then
  echo "Error: VM_ID must be a number between 01 and 99"
  exit 1
fi

check_valid_path "$ROOTFS_PATH"
check_valid_path "$KERNEL_PATH"
check_command_installed firecracker
check_command_installed tmux

MAC_ADDRESS="AA:FC:00:00:00:$VM_ID"
TMUX_SESSION_NAME="firecracker-$VM_ID"
FIRECRACKER_SOCKET="/tmp/firecracker-$VM_ID.socket"

# Kill tmux session if exists
if tmux has-session -t "$TMUX_SESSION_NAME" 2>/dev/null; then
  echo "Tmux session '$TMUX_SESSION_NAME' already exists, killing it..."
  tmux kill-session -t "$TMUX_SESSION_NAME"
  sleep 2
fi

# Kill socket if exists
if [ -e "$FIRECRACKER_SOCKET" ]; then
  echo "Socket already exists, deleting it..."
  pkill -f "$FIRECRACKER_SOCKET" || echo ""
  rm "$FIRECRACKER_SOCKET"
  sleep 2
fi

tmux new-session -d -s "$TMUX_SESSION_NAME" "cd /var/lib/firecracker && firecracker --api-sock $FIRECRACKER_SOCKET"

echo "Configure network-interfaces"
make_curl_request "$FIRECRACKER_SOCKET" "network-interfaces/eth0" '{ "iface_id": "eth0", "guest_mac": "'"$MAC_ADDRESS"'", "host_dev_name": "'"$NETWORK_INTERFACE"'" }'

echo "Configure kernel path"
make_curl_request "$FIRECRACKER_SOCKET" "boot-source" '{"kernel_image_path": "'"$KERNEL_PATH"'", "boot_args": "console=ttyS0 reboot=k panic=1 pci=off"}'

echo "Configure rootfs path"
make_curl_request "$FIRECRACKER_SOCKET" "drives/rootfs" '{"drive_id": "rootfs", "path_on_host": "'"$ROOTFS_PATH"'", "is_root_device": true, "is_read_only": false}'

echo "Start the VM"
make_curl_request "$FIRECRACKER_SOCKET" "actions" '{"action_type": "InstanceStart"}'

echo "You can obtain an interactive session with the command: tmux attach -t $TMUX_SESSION_NAME"
This script allows you to create a VM with the following parameters:
- an identifier (between 01 and 99)
- a rootfs file (which must be in
/var/lib/firecrackeror an absolute path) - a kernel file (which must be in
/var/lib/firecrackeror an absolute path) - a network interface (optional, default is
tap0)
You can launch a first VM with the following command:
./run_vm.sh 01 debian-rootfs.ext4 6.6-vmlinux tap0
And a second VM with the following command (using a different rootfs):
./run_vm.sh 02 alpine-rootfs.ext4 6.6-vmlinux tap1
The only dependencies are firecracker and tmux. The script will create a socket in /tmp/firecracker-VM_ID.socket and a tmux session named firecracker-VM_ID. You can connect to the tmux session with the command tmux attach -t firecracker-VM_ID.
The MAC address is automatically generated based on the VM identifier. The VM with ID 01 will have the address AA:FC:00:00:00:01.
Info
The script does not create the TUN/TAP network interface, so you need to create it manually before running the script.
TAP_INTERFACE=tap1
BRIDGE_INTERFACE=br0
ip tuntap add dev $TAP_INTERFACE mode tap
brctl addif $BRIDGE_INTERFACE $TAP_INTERFACE
ip link set dev $TAP_INTERFACE up
Alright, I agree, this is not a very clean solution, but it saves me from typing the same commands 10 times in my test environment and I don’t (yet) need a third-party solution to manage my VMs.
(Optional) VMs in our LAN
If you prefer your virtual machines to be directly accessible from your LAN without going through NAT, you can follow the procedure below:
Let’s create a new bridge interface named vmbr0, which will be connected to my ens18 interface (which is connected to my LAN). The IP address of my host machine will be configured on vmbr0 instead of ens18.
To do this, let’s modify the content of the file /etc/network/interfaces to add an interface vmbr0 and remove automatic addressing on ens18.
allow-hotplug ens18
#iface ens18 inet dhcp <----- comment out this line
iface ens18 inet manual # <----- add this line

# Create a bridge interface named vmbr0
auto vmbr0
iface vmbr0 inet static
  address 192.168.1.35/24 # Old IP of ens18
  gateway 192.168.1.1
  bridge-ports ens18
  bridge-stp off
  bridge-fd 0
Let’s restart the host machine for the changes to take effect (which also implies removing the TUN/TAP interfaces and IPTables rules). Then, let’s create a tap0 interface and add it to the vmbr0 bridge.
TAP_INTERFACE=tap1
BRIDGE_INTERFACE=vmbr0
ip tuntap add dev $TAP_INTERFACE mode tap
brctl addif $BRIDGE_INTERFACE $TAP_INTERFACE
ip link set dev $TAP_INTERFACE up
Now, we can create a new VM using the run_vm.sh script with the network interface set to tap1.
./run_vm.sh 01 debian-rootfs.ext4 6.6-vmlinux tap1
The VM will have an IP address in the same network as the host machine and will be accessible from the same LAN.

Expose the socket over TCP
When we manage Firecracker, we use a UNIX socket. This socket is operational only from the host machine. If we want to control Firecracker from another machine, we need to expose this socket over TCP.
To do this, we will use socat to create a TCP tunnel to our UNIX socket.
apt install socat
socat TCP-LISTEN:8080,reuseaddr,fork UNIX-CONNECT:/tmp/firecracker-01.socket
We can now control our VM from another machine (instead of the host machine).
➜  ~ curl 192.168.1.35:8080
{"id":"anonymous-instance","state":"Running","vmm_version":"1.6.0","app_name":"Firecracker"}
Conclusion
Firecracker is a very interesting tool for creating numerous lightweight virtual machines in just a few milliseconds. I can see it being used effectively in a CI/CD environment to create testing environments, for deployment, or even for creating on-demand development environments. Why not use it as a development workshop during a hackathon?
There are still many aspects of Firecracker to explore. For instance, I haven’t mentioned jailer (a component for adding a security layer), snapshot management, or resource allocation (CPU, RAM, etc.). I therefore invite you to refer to the official documentation to learn more.
It’s hard to predict how I will use it, but I hope to provide you with feedback on more concrete use cases in a few months.
Info
I had planned to talk to you about Ignite, a Weavework tool for managing VMs on Firecracker. However, it has been abandoned in favor of Flintlock, which I haven’t had the time to explore yet.
It is possible to use Firecracker without using UNIX sockets. I intentionally chose not to discuss it in this article because I believe it undermines the very purpose of Firecracker. However, if you want to learn more, I once again invite you to consult the official documentation.